Your Cart is Empty
How To Wax Eyebrows: The Complete Guide for Beginners
by Kirstyn Porter August 30, 2024 7 min read
0 Comments
There’s nothing like being out in the world with a freshly shaped pair of eyebrows! If you’re like me and fixate on each stray hair each time you look in the mirror, you know how great it feels to have your eyebrows waxed.
Whether you’ve been waxing for a while in your home space or a new waxer experimenting with at-home waxing for the first time, this complete guide on how to wax eyebrows for beginnerswill be your new go-to for all things eyebrow waxing.
Table of Contents
Eyebrow Waxing Benefits
Learning how to wax your eyebrows (the right way!) has a ton of potential benefits. Since waxing removes hair from the root, the hair that grows in the next regrowth stage is weaker and softer. Weaker and softer hair not only lessens the pain of your next wax, but also makes plucking in between waxing services less painful too.
A second benefit of eyebrow waxing is helping tame unruly hair. Eyebrow hair is notoriously coarse and consistent waxing can actually be the solution to retraining the hair to grow in a certain direction. Newer thinner hairs that grow in post-waxing are much easier to comb into placewithouta pricey eyebrow gel!
Last but not least, eyebrow waxing can really help you achieve facial symmetry.Learning how to wax eyebrows properly with shaping will frame the entire face below and balance out features.
How to Wax Eyebrows Step by Step
- Heat your wax - make sure the temperature isn’t too hot, always test by applying it on your inner wrist before application! To start turn the warmer all the way high until the wax melts. Then, throughout the service monitor the temperature consistently.
- Clean your brows by using a cotton round saturated with pre-wax cleanser. Then, use a cotton round saturated with water and go over the same area. Wait until the skin is dry to begin applying wax.
- Trim your brows by brushing the hairs straight up with a spoolie. Remember to start conservatively. “You can always remove more hair but you can never add more hair,” is a rule to live by when learninghow to wax eyebrows!
- Mark out your brows by using the mapping process described below. You want to focus on the natural shape of the face and starting and ending points. A pencil, pen, or string makes life a lot easier when mapping!
- Begin laying your first strip of wax very slowly, with the direction of hair growth. I always start from the underneath outer edge then make my way towards my under inner eye and repeat the process above the brow but it’s all preference! You can experiment and what find out works best for you.
- Hold the skin very taut and pull in the opposite direction you laid the wax in. This not only effectively removes hair, but also reduces any pain.
- Immediately apply pressure to the waxed area and repeat the process until all desired hairs have been removed. You can apply pressure by using a finger horizontally.
- Tweeze any stray hairs. Always tweeze in the direction of hair growth to reduce pain and the risk of tweeze marks.
- Apply aftercare products with a cotton round. Remember - it’s normal for the skin to be a little red after waxing!
Read: The Complete Brazilian Wax Guide
Eyebrow Waxing Styles
One of the best benefits of eyebrow waxing is how much a good eyebrow wax can enhance your features. In order to get the most out of your wax, understanding what style of eyebrow is most complementary is a game changer!
Heart-shaped faces: If your chin is the tip of the heart then your brows should be round to create a natural, soft, and feminine look that completes the shape of your face.

Oval-shaped faces: If your face tapers towards the chin, then angled eyebrows will soften your look but still help make your eyes be the center of attention.

Round-shaped faces: If you have somewhat of a wide face then curved brows with a medium to high arch height will lengthen your face appearance.

Square-shaped faces: If you have this type of face I suggest an angled eyebrow with a thick strong arch to create balance.

Long-shaped faces: If your forehead to chin is elongated than a horizontal flat brow line or straight brow line will accomplish the illusion of a shorter face.
What Supplies are Needed for Eyebrow Waxing?
When learninghow to wax eyebrowsa huge preparation task is assessing your needs. Most of the supplies you need are standard waxing supplies, like your wax of choice, pre and post-care products, spatulas, and a wax warmer. Brows, however, may also require things like spoolies, tweezers, and markup pencils.
All in all, the supplies you will need depend on your personal preferences but one thing to consider if you’re a beginner is buying a starter kit.
Our new and improved Eyebrow & Face Waxing Kit now includes a digital wax warmer and is perfect for anyone learninghow to wax eyebrows at home because it has a small warmer compact enough for any at-home space. It also contains the basic supplies necessary for an eyebrow wax, like pre and post-care and spatulas.

How to Prep for Eyebrow Waxing
The skin around the brows is super delicate and sensitive, which makes prepping when learninghow to wax eyebrows an extra important skill! The first thing you want to do when prepping is set your wax warmer at a temperature that won’t make the wax too hot. The skin around the eyebrows is very susceptible to burning so always monitor the wax pot throughout the service.
The next step in prepping is cleaning the brows. To do this, you want to get a cotton round and a pre-wax cleanser. After one pass with the cotton round and pre-wax cleansing gel, do a second with a round soaked with water.
Finally, do a pass with a dry cotton round to make sure the brow hairs and skin are fully dry.
How to Map for Eyebrow Waxing

Creating the perfect brow is truly a form of art! There are many variations of brow shapes out there and while that may seem daunting, Brow Mapping is your sure-fire way to nail the best brow each time.
Our founder, and brow queen, Liz Lugo has the best method for mapping out the brows.
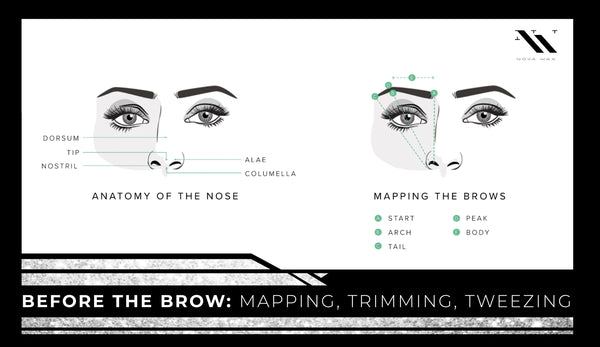
Once you’ve analyzed the general shape of the brow, you will use the nose as a point of reference to make your three key marks: the Start, Arch, and Tail.

Liz recommends using a white pencil to make your marks, as it helps the points of reference stand out and the pencil marks are easy to remove once you’re done.
To define the start, line your pencil up with the uppermost part of the nostril (fun fact: this part of the nose is called the Alae) and lead it straight up to the brow area.
To determine where the arch will hit - you’ll have your client look straight ahead (this is super important!) and create a diagonal line with your pencil, starting from the tip of the nose and crossing through the pupil until it intersects with the brow.
To finish it off, you’ll mark the tail end of the brow by aligning your pencil with the outer bottom of the alae and the outer corner of your eye. Where the pencil hits the brow from that angle will mark the tail.

Read: The Complete Brazilian Wax Guide
At-Home Eyebrow Waxing Tips
Learninghow to wax your eyebrows at home can be pretty daunting but there are a few ways to ease some stress! Check out the following video from Beauty Insider to hear our very own Liz Lugo give expert tips for waxing eyebrows at home.
It is very important to plan out your wax strips carefully. Since you’re waxing in the upright position and the wax is going right near your eye, you want to make sure that your wax isn't dripping or breaking and getting into your eye or eyelashes.
Planning exactly where you're placing your strip even before you dip your spatula is key. Ahigh-quality waxthat doesn’t break is also essential for preventing any wax disasters!
You also want to ensure you is get a super dark pencil for your mapping process. Although that might sound questionable, when you’re at home your light may not be as good as the magnifying lighting estheticians have.
When using a dark eyebrow pencil to map your brows you’ll be able to distinctly see what areas you’re removing and what areas you’re keeping. You may look crazy for a little bit but your results will be worth it!
Also be sure to use post-wax care products for the longest lasting results.

Professional Eyebrow Waxing Tips
One of the biggest tips as for estheticians when it comes to learning how to wax eyebrows on clients is managing expectations.
READ: How to Become an Esthetician
Some clients will come in asking for a brow shape that just isnt achievable for their brow type and its your job as an esthetician to help them feel good about the shape they can achieve!
The best way to anticipate this is by having a handheld mirror and helping them feel involved in the shaping process. Make sure you explain where you’ll be taking off hair and under-wax the first time around.
Then, you can show them and ask if they’d like more hair to be taken off. It’s always best to go slowly, especially if it’s a client new to eyebrow waxing!
Another tip for professionals is to have a brow makeup product in your studio space. If your client needs extra guidance with how to apply eyebrow makeup to fill in their brows it’s a great opportunity to show them the best way to once you’re done with your service.
READ: How to Wax Eyebrows Professionally
Final Thoughts
Learning how to wax eyebrows might be one of the best investments of your time you can make! Not only are they a very popular service to provide as an esthetician, but touching up your brows with a wax at-home can give you a great confidence boost too.
After you determine what shape is most flattering, map the brow out with detail, and wax your brows (always starting slowly!) you’ll definitely understand the hype!
At Nova wax we have everything you need for the perfect clean eyebrow wax.


